This will delete the page "Home". Please be certain.
What is GIN?
Management of scientific data, including consistent organization, annotation, and storage of data, is a challenging task. Accessing and managing data from multiple workplaces while keeping it in sync, backed up, and easily accessible from within or outside the lab is even more demanding. To minimize the time and effort scientists have to spend on these tasks, we offer the GIN (G-Node Infrastructure) services, a free and open data management system designed for comprehensive and reproducible management of neuroscientific data.
Table of contents
Help and info pages
- Info
- Frequently Asked Questions
- GIN website
- GIN Command Line Client (gin-cli)
- GIN for Windows (WinGIN)
- GIN with DataLad
- Publishing
- Advanced Topics
Overview
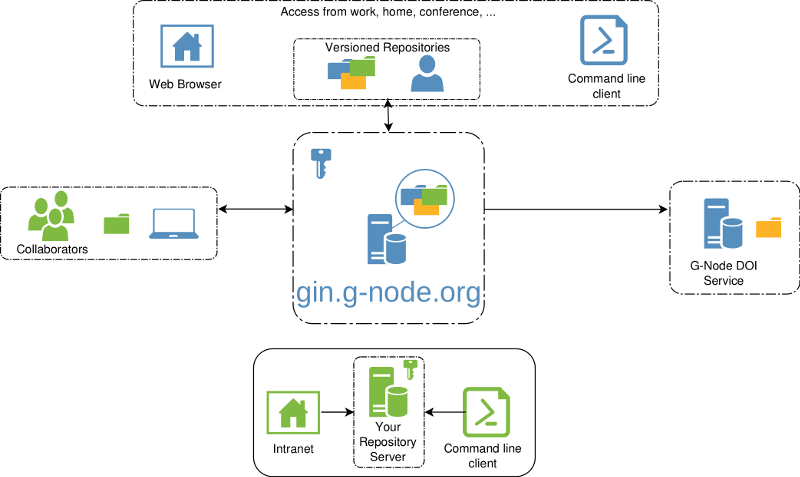
The GIN platform is a web-based repository store that you can reach from everywhere, which is secure and which provides fine-grained access control. This enables sharing data with collaborators or publishing your data to the greater scientific community. Both you and your collaborators can work independently, using versioned repositories at work, at home, or wherever you want. All this can either be achieved through various convenient client interfaces or by using the underlying tools (git, git-annex) directly. You can also set up your own GIN server.
If you are unfamiliar with GIN and/or git version control, you can find more details in our short GIN introduction.
Why you should use GIN
In short: GIN gives you a lot of possibilities while minimizing the time and effort you need to invest. It helps you to:
Manage your research data
- Upload and access your data anywhere, anytime: Because your data is stored within repositories, any changes you make whether locally or online can be easily tracked and thereby you can keep your data in sync.
Version your data
- When changing your files and uploading them to the server, the history is automatically kept, you can always go back to a previous version.
Share your data
- Collaborating with others in GIN is incredibly easy: you can assign specific read-only / read-write permissions for particular users, make your data publicly available or even citable with GIN's own DOI service:
- A DOI can be obtained after a couple of easy steps: uploading the data, making the repository public, creating a DOI metadata file and finally requesting the DOI with a mouse click. See details here.
On top of all these features, GIN is flexible, free and open source! You can use it locally, online or even set up your own in-house instance.
How do I start?
Quickstart: Web interface
- Register an account on the GIN server.
- Create a repository and initialize it with a README.
- Upload some data to this repository using the web interface (max 10 GB per file & 100 files per upload; for larger files use the GIN client).
- Browse your files. Continue with Obtaining a DOI, sharing your data or simply with adding more files.
- Read the detailed How to for further instructions.
Quickstart: Local GIN client
- Register an account on the GIN server.
- Download and install the GIN Client (see here for a guide).
- Confirm that everything is working properly by typing the command
gin --version. - Use
gin loginto confirm your identity with the GIN server (This requires the username and password from your GIN server account). - Use
gin create <repository name>to initialize a new repository, orgin get <user name>/<repository name>to download an existing repository to your local workspace. - Add files to your local repository and upload them to your GIN server repository using
gin upload . - Browse your files locally or online. Continue with Obtaining a DOI, sharing your data or simply with adding more files.
Quickstart: WinGIN (Windows only)
- Register an account on the GIN server.
- Download and install WinGIN.
- Start WinGIN and sign in with your GIN account (created in step 1).
- Click on the "Repositories" tab in the WinGIN window. Click the "Checkout" button to download existing repositories to your local workspace. Alternatively, click "Create New" button to initialise a new repository. The "Remove" button can be used to delete repositories from your local workspace.
- If you "Checkout" a repository, it will be downloaded and organised in the workspace directory on your desktop (see the detailed walkthrough for more).
- When the application window is closed, you can operate and manage local repositories by right clicking on the GIN icon in the system tray and choosing from the options.
Quickstart: DataLad
- Register an account on the GIN server.
- Download and install DataLad.
- Follow the instructions in the DataLad Handbook.
Detailed Guides
You can use the GIN system via the web interface or via downloadable client tools. For detailed guides on setup/installation, basic and advanced workflows, as well as tips and tricks, check out the corresponding links below.
- How to use: Web interface
- How to use: Local GIN client
- How to use: WinGIN
- How to use: DataLad
Here are also some notes on how to use git-annex directly.
Advanced: Setting up your own in-house GIN service
All of the GIN services are Open Source software. If you want to manage your data solely within your lab on your own servers, this can easily be done! Find instructions here.
FAQ, Troubleshooting, and further questions
If you run into any problems during setup or usage of the GIN services, we would invite you to first check out the FAQ. If this does not solve your problem, then we would be happy to help you out in person! You can contact us via email (gin@g-node.org).
For anything bug related regarding ...
the web service you can also open issues on the corresponding github repository.
the GIN client you can open issues on this github repository.
M. Sonntag edited this page 2 years ago
Delete Page